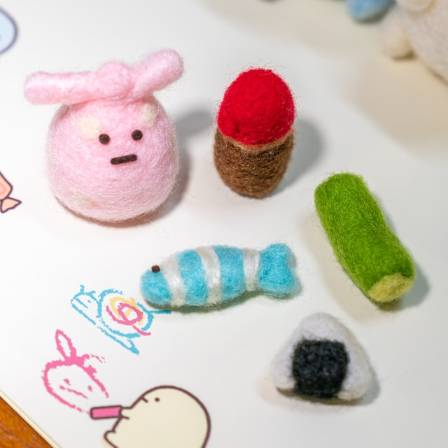
Creating realistic needle-felted animals is a rewarding artistic journey that transforms loose wool into expressive, three-dimensional sculptures. Many beginners wonder how artists achieve such a high level of detail and lifelike character. By mastering the right combination of wool types, needle gauges, and structural techniques, anyone can learn to sculpt adorable animal figures with precision and personality.
Essential Materials and Wool Selection
The success of a felted figure depends heavily on the type of wool used for different stages of the process. For the internal structure, or "core," Corriedale batts or slivers are ideal because they felt quickly and provide a firm, sturdy base. This allows you to build the primary shape without excessive effort.
For the visible outer layers, Merino tops offer a sleek, smooth finish perfect for short-haired animals. If you are aiming for a softer, more realistic fur texture, alpaca or Suri blends provide a delicate touch. For coarser coats, such as those found on sheep or larger woodland creatures, undyed Shetland or Romney wool adds natural tone variations that mimic real animal fur.
Choosing the Right Tools for Detail
Using the correct needle gauge is essential for achieving a professional finish. A 36-38G triangular needle is the standard for initial shaping and sculpting. As the figure takes shape, a 38G star needle helps in blending colors and smoothing the surface. For fine facial details and delicate areas, a 40G triangular or twisted needle provides the necessary precision.
One of the most transformative tools for adding realism is the reverse felting needle. Unlike standard needles, it pulls fibers outward, making it perfect for creating fluffy textures or blending colors on the surface. Additionally, using multi-needle tool handles can reduce hand fatigue when working on larger sections of the sculpture.
Anatomical Shaping and Structural Integrity
To achieve accurate proportions, it is helpful to view the animal as a collection of simple geometric shapes. For example, limbs can be visualized as cylinders or cones, heads as ovals, and bodies as teardrop shapes. Using reference photos or anatomy diagrams during this stage ensures that your sculpture looks balanced and natural.
For added stability and the ability to pose your figure, a wire armature acts as a skeleton. Thicker wire is suitable for larger animals, while thinner gauges or pipe cleaners work well for smaller creations. Wrapping the wire tightly with core wool prevents slipping and provides a consistent surface for the outer layers. Always compare the size of limbs and the head before permanently attaching them to the body to maintain symmetry.
Advanced Techniques for Fur, Eyes, and Features
Creating a natural-looking coat often involves layering multiple shades of wool. Hand-blending small amounts of light, mid, and dark tones can create a sophisticated gradient that looks far more realistic than a single flat color. Depending on the desired effect, you can layer tufts for long hair or use a reverse needle for a fuzzy, soft finish.
The "soul" of the sculpture often lies in the eyes. While glass or resin eyes are popular, you can also sculpt eyes entirely from wool. Adding a tiny white dot to simulate light reflection provides an instant spark of life. For additional detail, tiny paws can be defined with fine wool lines, and whiskers can be added using horsehair, fishing line, or even paintbrush bristles. These small touches transform a simple felted shape into a cherished, lifelike animal ornament.